Structure editing
cApp uses an embedded version of
JChemPaint as a chemical editor. This enables the user to add new compounds or edit existing ones within cApp. Compounds can only be added or edited on sets that have been generated as 'Appraise' tasks.
Adding a compound
From the menu bar, use the option Compound Set - Add compound - Chemical Editor to launch the embedded version of JChemPaint. A new compound will be added to the currently active set (if there is no set yet, one will be created). Once editing is finished and the user clicks Accept in the JChemPaint window, the cApp compound set is updated.
Editing a compound
| 1. |
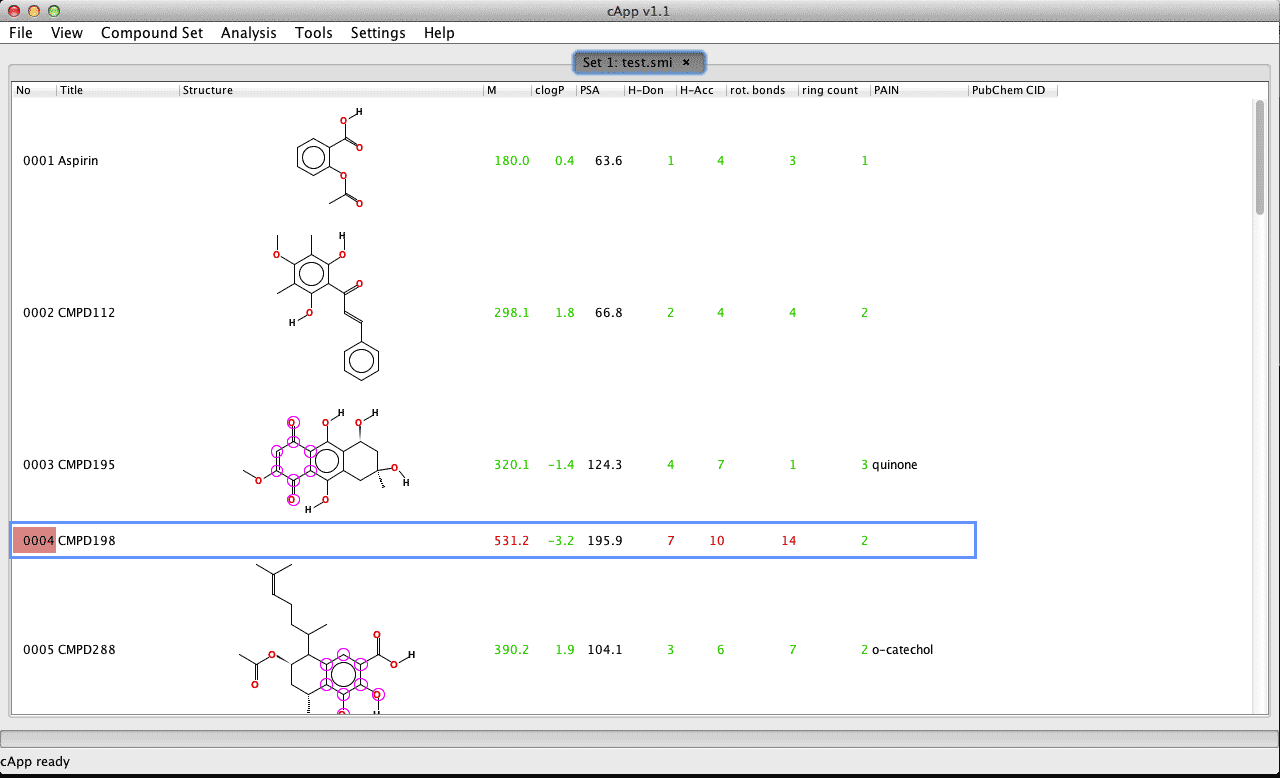
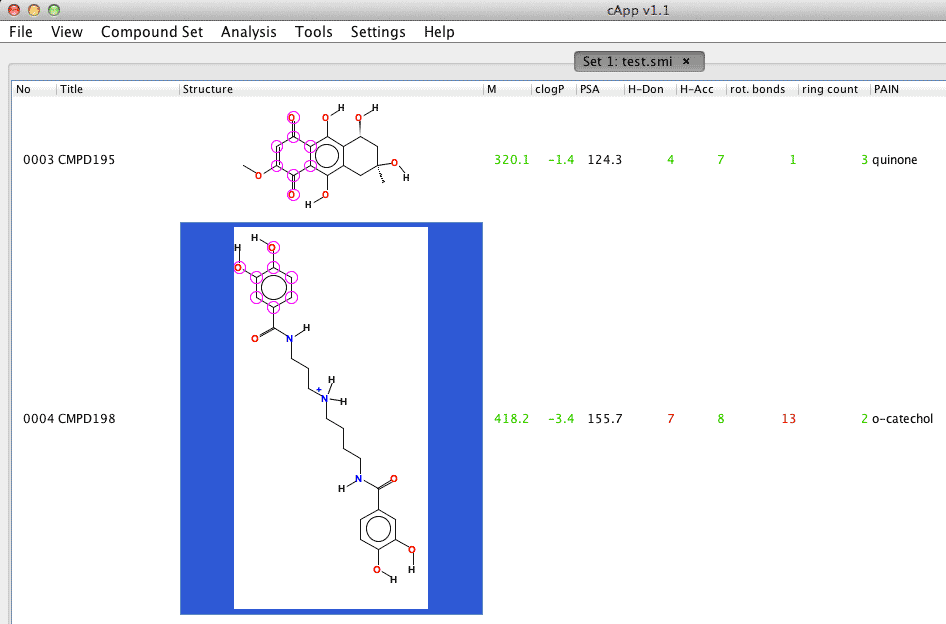
As seen in this example set, the 4th compound 'CMPD198' could not be automatically generated when the compound set was loaded from a list of SMILES codes (compound number with the red highlight in the first column). |
 |
|
| 2. |
Select and right click the cell in which the rendered compound should appear. Select Open in chemical editor. |
 |
|
| 3. |
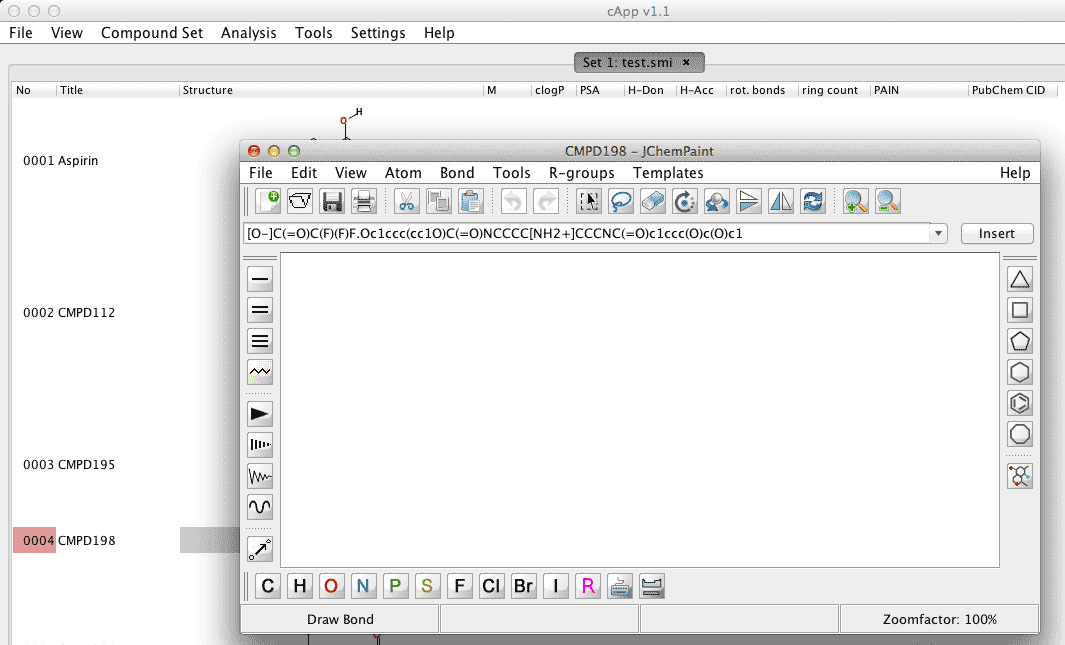
The SMILES code of the compound will appear in the text field of the JChemPaint window. Since this SMILES code could not be automatically rendered into a structure by cApp, JChemPaint also will not be able to render a structure. |
 |
|
| 4. |
Inspect the SMILES code and identify the error. In this example, the SMILES string codes for two molecular entities, separated by a '.'. |
 |
|
| 5. |
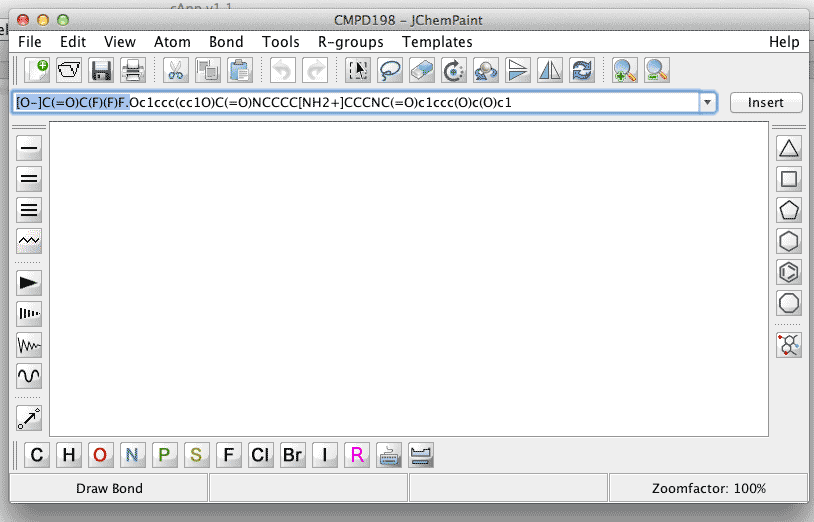
Removing the counter-ion to the small-molecule (which is charged) will re-solve the problem, and after clicking Insert next to the JChemPaint text field, the structure will be generated. |
 |
|
| 6. |
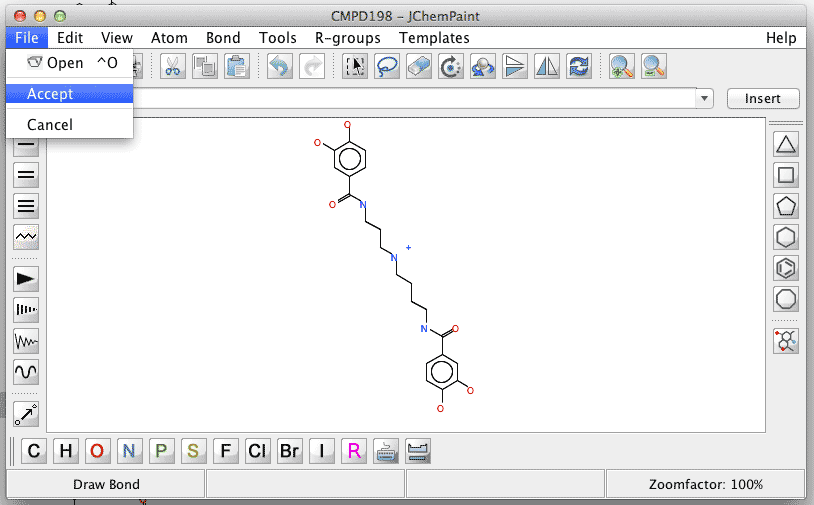
The editing session is finished either by choosing Accept or Cancel from the File menu item in the JChemPaint window. Do not close the JChemPaint window by clicking the window closing X in the upper right corner as it is equivalent to Cancel. |
 |
|
| 7. |
Upon acceptance in the previous step, the compound data in the cApp compound set will be updated. |
 |
|
| 8. |
Note: When modifying a compound with the in-built chemical editor, the 3D structural
information gets re-set. Therefore, if a three-dimensional model for this compound existed
in this compound set, the edited molecule will appear as a 2D model after the editing
process.
3D coordinates can potentially be generated with the built-in feature
Generate 3D coordinates; however, as
mentioned, this is not a rigorous method and works for some, but not all molecules.
Another option to add three-dimensional information to a compound is to use Update 3D coordinates from external SDF file from the pop-up menu. With this feature, an
externally generated 3D conformation of the compound can be loaded.
|
User-specified data
Individual compounds within a set can be annotated with user-specific information, such as results from enzyme assays, external files or comments. Since the table representation of a compound set in the GUI can be sorted based on information in any of the columns, it is advisable to carefully consider the data structure to be added. For example, if enzyme assay results in the form of numerical data are to be added, the numerical values should be the only information entered into that specific column. Consequently, the column can be sorted strictly based on the numerical value in the GUI.
File links and URLs in a cApp compound set can be viewed through the user's web browser of choice. The location of the browser executable needs to be provided to cApp. If the location has not previously been provided, cApp will ask for the executable path at the first instance of using the browser. Alternatively, the location can be entered under Settings - Local settings from the menu bar. The specified browser location is stored in cApp projects saved in the proprietary binary format.
There are two ways of adding user-specific information. One is to create an empty column and manually add information to individual cells. The other option is to read an external ASCII file, the information of which will be used to auto-populate the user-defined column; this column will be automatically created in the process.
Manually adding user-specified data
Number/Text
| 1. |
To add a new column with free text or numbers, select the compound set where the column is to be added. To select a compound set, simply click on the tab of the set at the top of the panel. |
 |
|
| 2. |
In the menu bar, click Compound Set, and then select Add column. |
 |
|
| 3. |
In the pop-up window, choose the correct column type to be added: Numbers/Text ... |
 |
|
| 4. |
... and enter the column header. |
 |
|
| 5. |
To add text/numbers to individual cells, select the cell with a left-click which allows editing the cell's content. |
 |
File link
| 1. |
In the menu bar, click Compound Set, and then select Add column. Select column type File link in the pop-up window and enter the column header. |
 |
|
| 2. |
To enter a file link in a specific cell, select the cell by a left-click, and then right-click to obtain the pop-up menu. Select Add file link. This will produce a pop-up window where a file location can be entered. |
 |
URL
| 1. |
In the menu bar, click Compound Set, and then select Add column. Select column type URL in the pop-up window and enter the column header. |
 |
|
| 2. |
To enter a URL in a specific cell, select the cell by a left-click, and then right-click to obtain the pop-up menu. Select Add URL. This will produce a pop-up window where a web location can be entered. |
 |
User-specified data from external file
This feature is useful if external data (e.g. numerical data from assays) are available for some or all of the compounds in a set. Those data should be arranged in a two-column ASCII file with data for one compound in each line. The entry should have the compound title and the associated data, separated by one or more spaces (see
example). The compound title column may either be the first or the second column.
Choose
File - Add data column and then provide the location of the ASCII file with external data, and a header for the new column to be added.
A new column is added at the end of the table of the presently active tab and populated with information from the user-provided ASCII file, if a compound ID in the ASCII file matches the compound ID in the presently active tab.
When processing the input file, cApp determines whether the data to be added are of the type (alpha)-numerical, file link or web link (URL). In order for file links to be recognised, the files must exist in the specified location.
Columns
The tabular presentation of data in cApp has two categories:
- pre-set columns (appraise task: 12, similarity search task: 10, compound clustering task: 4)
- user-defined columns
The pre-set columns are located on the left hand side of the table and user-defined columns can be added on the right-hand. The column positions cannot be altered.
The table in the GUI can be sorted ascending or descending with respect to values in a particular column by clicking the header of that column.
Hide columns
Remove columns
In order to remove a column, select a cell of that column by a left-click, then right-click to obtain the pop-up menu. Select Remove column to delete the selected column and the associated data from the compound set. This option is only possible with user-generated columns. The pre-set columns cannot be removed.
Image parameters / Draw hydrogens
Image parameters can be changed either for an entire set (use Compound Set - Image parameters from the menu bar) or for individual compounds only (select a compound by left-click, then right-click and choose Image parameters from the pop-up menu).
Applying changes to the image parameters affects the rendering in the GUI, the written PNG image files (if requested), as well as the image files used in the HTML reports (if requested).
The user can alter some parameters of the rendered structure images. By default, the image width and height of each rendered structure is determined automatically (Auto Image Scale - Yes). If custom image width and height are to be used, the values can be entered under Image Width and Image Height; the Auto Image Width option must then be set to No.
The default rendering setting in cApp has the option Render with Hydrogens set to No and thus only renders polar hydrogen atoms of compounds. If all hydrogen atoms are to be rendered, the option Render with Hydrogens should be set to Yes.
Image parameters for an entire compound set
| 1. |
To render all hydrogens of compounds in an entire set, choose Compound Set from the menu bar and click Image parameters, set Render with Hydrogens to Yes. |
 |
Image parameters for a selected compound
| 1. |
To render all hydrogens of a specific compound, select the compound by a left-click, then right-click to obtain the pop-up menu and choose Image parameters. |
 |
|
| 2. |
In the Image parameter window, select Render with Hydrogens - Yes and click OK. |
 |
|
| 3. |
The structure image in the GUI is updated. Note that the hydrogen setting also affects rendering in the molecular viewer. |
 |